I've been taking pictures of making a pair of scuffs for a client Rebecca T. I was really excited about making this pair because I finally got my Chinese Stitcher working. I bought it almost 5 years ago and I could never get the thread or tension correct. Knowing that I really wanted a finished leather edge on these shoes gave me the incentive I needed. As you can see this machine is a hand-cranked machine, not great for my elbow, but I can control the speed.
 This is my first successful stitching. You can see I went off the edge at the end, mostly because I didn't have the leather squared up on that end, the leather on the back ran short and the stitching foot slid off the felt.
 Pieces of the vamp cut out
 Vamp, top edges glued together with the edging glued in place. I then flipped this piece over and glued it down to the leather. Gluing is the way to go since you can't pin through it, pins will make holes.
 Stitching close up, I might try a larger top thread next time. I'm very pleased with the results.
 I was fairly consistent, the edge where I dipped a bit is under the sole!
 I was worried about the curve, but it was easy to control.
 I used a cork insole, which is just tacked onto the last(the form I use to make the shoes) and here I have glued just the lining of the vamp to the insole
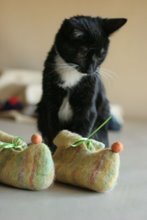
 The first glimpse of how the shoes will look.
 This is the toe cap attached. I'm using a heat activated material and have I skived the top edge. This knit material when heated in the (dedicated)toaster oven becomes soft and pliable and has an adhesive side. Once it has cooled provides a way to keep the toe shape.
 I've glued the rest of the outer vamp down and around the insole, added pieces of cork to fill in the gaps and added another layer of cork to even out the sole.
 With the first of two layers of glue on the sole, I decided to add some strength by using the heat activated toe cap material. It also helps smooth out the bottom for attaching the outer sole.
 I custom cut leather soles and glued leather on some heels. I then sand the edges with my lovely bench sander. It's a little tricky because I have to get it all even with the insole, before gluing them together.
 This is the outer sole edge coated, this seals the leather and makes it look more uniform when the shoe is complete.
 Soles glued on. I use two layers of contact cement, pretty nasty stuff so I do this outside.
 Ta-da! The insole covering is glued into the shoe. I must say it is always my most dreaded task. It's really hard using contact cement in such a tight place and not mess up!
This is the view from my outside work table, luckily the weather cooperated this week and warmed up a bit.