Wednesday, September 1, 2010

Welcome September

This month I am starting a give-away. Just post a comment to the question, should wooly walkers have a facebook page? I will randomly choose a winner, the prize will be an fine point Oxford Punch Needle size #9.

The #9 creates a 3/8" high loop and the fine point uses a single strand of worsted weight yarn. I love combining different height loops in the same piece it can really create amazing textures. You can also use a tall
er loops to accentuate a particular design element, such as lettering, it literally makes them pop!


courtesy of The Oxford Company

I am also starting a monthly newsletter, if you'd like to be included just let me know!

Tuesday, June 1, 2010

New shoes

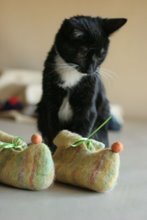
A couple of new shoes that will be available at my upcoming shows.

I'll be at the Estes Park Wool Market, in Estes Park, CO June 11th-13th.

We (my Husband Will & I) then travel over to Eugene, OR for the Black Sheep Gathering June 18th -20th.

In July We'll be heading East to Albuquerque, NM where we'll take a left turn at Convergence 2010, July 21st-25th.

August 6th-8th We'll be in San Francisco for the American Craft Council Show

Tutti Frutti is Woman's size 8, Polka Dots is Woman's size 7 1/2


Thursday, May 27, 2010

Ancient Paths New Visions

Ancient Paths New Visions is the theme for this years Convergence 2010 and the Designing Weavers theme as well. I started off wanting to explore a little Shibori dyeing, since felting is already an ancient. Shibori is the Japanese term for resist dyeing using threading, bunching, clamping, and today's tie dye techniques are based on these methods. I first made a large piece of felt using C-1 wool and started to sew threads.I used embroidery thread that I had, it was strong enough and only broke a few when I was pulling them.

Dyeing was the next challenge, originally it was going to go with a friend piece that she was working on, but I couldn't get the vibrant colors that she had in her weaving, so I went with colors that I would like. Purple, green & yellow
I didn't really like the colors so I re-folded the felt in the opposite direction, tied it so the folds would stay and added a brown dye.
Now for the fun part, I made a pair of boots! I didn't take pictures of the process, but here are the finished boots.


With my ancient techniques of Felting and Shibori, my new vision is a wearable pair of boots.

Tuesday, March 16, 2010

Kumquat Marmalde

Kumquats are a strange little fruit, They measure from 1/2 an inch up to 1 1/2 inches. They're in the citrus family but you eat the whole fruit and actually the skin is sweeter than the pulp.

Zoe, our dog, loves oranges and will wake from a sound sleep if there is an orange being peeled, kumquats are a different story, she really wants to love then as much as oranges, but will only eat the really ripe ones! I don't know how she knows that.
I looked at a lot of recipes and decided that I'd go with one that doesn't use pectin and was in a smaller batch. this is a modification between two recipes. Easy is what I like!


2 Cups of sliced Kumquats I found that it was easier to just slice them with a knife. I tried the mandolin and the Mouli slicer, but it wasn't working with either. I also thought the seeds would be a problem but they were easy to pick out and when you added the water most floated to the top.

Some recipes had you save the seeds and tie them up in a cloth and cook them with the marmalade but I couldn't find out why? Natural pectin I suppose?


Soak the Kumquats in 4 cups of water overnight to soften the skins, not really sure this step is necessary but a lot of the recipes I read used this method.


The next day bring the skins to a boil. One recipe had you then drain and soak them again overnight. I didn't do that, I went right to the next step.


I added 1 1/2 cups of sugar and boiled it until it reached 220 on the instant read thermometer. It took about 45 minutes.


I was also going to add some Brandy at this stage, but it seemed to be missing...


Perfect amount and such a beautiful color. It jelled up beautifully when it cooled and it retained just enough of it's tartness. Now to make some bread to go with it!

Friday, March 12, 2010

Birth of a Shoe


I've been taking pictures of making a pair of scuffs for a client Rebecca T. I was really excited about making this pair because I finally got my Chinese Stitcher working. I bought it almost 5 years ago and I could never get the thread or tension correct. Knowing that I really wanted a finished leather edge on these shoes gave me the incentive I needed. As you can see this machine is a hand-cranked machine, not great for my elbow, but I can control the speed.


This is my first successful stitching. You can see I went off the edge at the end, mostly because I didn't have the leather squared up on that end, the leather on the back ran short and the stitching foot slid off the felt.


Pieces of the vamp cut out


Vamp, top edges glued together with the edging glued in place. I then flipped this piece over and glued it down to the leather. Gluing is the way to go since you can't pin through it, pins will make holes.


Stitching close up, I might try a larger top thread next time. I'm very pleased with the results.


I was fairly consistent, the edge where I dipped a bit is under the sole!


I was worried about the curve, but it was easy to control.


I used a cork insole, which is just tacked onto the last(the form I use to make the shoes) and here I have glued just the lining of the vamp to the insole


The first glimpse of how the shoes will look.


This is the toe cap attached. I'm using a heat activated material and have I skived the top edge. This knit material when heated in the (dedicated)toaster oven becomes soft and pliable and has an adhesive side. Once it has cooled provides a way to keep the toe shape.


I've glued the rest of the outer vamp down and around the insole, added pieces of cork to fill in the gaps and added another layer of cork to even out the sole.


With the first of two layers of glue on the sole, I decided to add some strength by using the heat activated toe cap material. It also helps smooth out the bottom for attaching the outer sole.


I custom cut leather soles and glued leather on some heels. I then sand the edges with my lovely bench sander. It's a little tricky because I have to get it all even with the insole, before gluing them together.


This is the outer sole edge coated, this seals the leather and makes it look more uniform when the shoe is complete.


Soles glued on. I use two layers of contact cement, pretty nasty stuff so I do this outside.


Ta-da! The insole covering is glued into the shoe. I must say it is always my most dreaded task. It's really hard using contact cement in such a tight place and not mess up!


This is the view from my outside work table, luckily the weather cooperated this week and warmed up a bit.

Saturday, March 6, 2010

Free form Mosaic

This is one of my newer bags, I've been having a blast combining techniques. The Circles & Squares of this "Mosaic" bag are felted pieces that have been sewn on and embellished with embroidery, beads and sequins. The rest is punch needled with varying yarns, some hand dyed, some commercially prepared yarns. I really adore free form punching, I was really inspired by a free form beading class I took with Robin Atkins if you ever get the chance to take a class from her, don't hesitate. She also has several books that are not only informative but inspirational.
Wow, it's been a while! I thought I'd try this again. A place for personal as well as professional insights. My newest find is The Welcome Mat, a place for Rug Hookers of all kinds to meet and get inspiration. Hopefully I can figure out how to get the button on this page!


Visit The Welcome Mat